Picture this: you’re a new author who finished the first round of editing. You open the manuscript in Microsoft Word and seepages full of red changes and margins packed with comments—it’s a little overwhelming! You want to get down to work, but navigating around all the different parts of Track Changes may appear difficult. Thankfully, it’s not as daunting as it seems.
This quick guide will help demystify the sometimes-arcane markings your editor leaves in your manuscript.
What Is Track Changes Anyway?
Track Changes is a built-in function of Microsoft Word that tracks document changes. Editors and authors use this function to suggest changes to the document without erasing the original content.
Edits appear in a different text color and you can be accept, reject, or alter them.
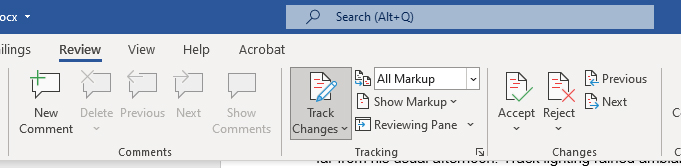
Activate it First
To activate Track Changes, open your Word document, go to the “Review” tab, and click “Track Changes” (see below).
Now, when you start typing, deleting, or editing, all changes will be immediately visible in a new color. Deleted areas will appear with a strikethrough, and any new additions will appear underlined for you to review.
Reviewing and Accepting or Rejecting Changes
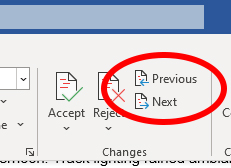
To help you be thorough, Track Changes can walk you through each change one by one. Simply go to the “Review” tab and look in the “Changes” section for the “Previous” and “Next” buttons.
The “Next” button will progress you forward through the changes, while the “Previous” button will send you to changes made earlier in the manuscript.
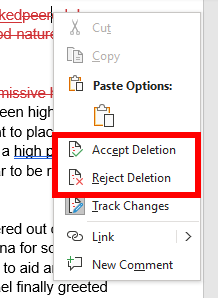
You can then review each change and decide whether it’s the right edit for you. You can use the “Accept” or “Reject” buttons, or you can right-click the changes in the text and select “Accept Change” or “Reject Change” from the menu (see below).
Editing Changes or Accepting/Rejecting Partial Changes
You can also adjust a change before you accept it. You can change the suggested text directly by clicking on it and typing or deleting text.
Once you’re satisfied, you can highlight the whole change and hit the “Accept” button.
Alternatively, you can also highlight part of a change and either accept or reject it. This will only alter the part you’ve selected and will leave the rest of the change for you to accept or reject. You can use this when you only want part of a change.
Different Views for Different Markup
You can also choose how to display markup in the document.
To access these views, go to the “Review” tab and select the top menu to the right of Track Changes.
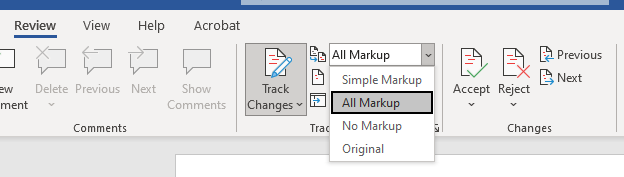
The default setting is “All Markup,” which will show you everything that has been altered, including deletions and additions.
“Simple Markup” displays the text as though all changes have been accepted. Red lines mark which sections have changed. This view is handy if you want to read through altered sections of the manuscript to check the flow.
“No Markup” is similar to Simple Markup but shows the text as though all changes have been accepted without any indication of where editing took place.
Finally, the “Original” option shows you the document as it was originally written—as though all suggested changes were rejected.
Displaying Markup Based on Type or Editor
The other menu next to “Track Changes” in the “Review” tab is “Markup Options,” which allows you to choose which kind of markup you want to see at a given time.
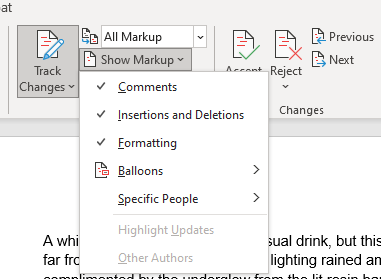
This allows you to show or hide comments, choose how markup shows up in the document, or choose to only see markup from a specific source.
If you have multiple people editing one document, you can pick and choose which feedback you see by unchecking the “All” selection and selecting the editor whose changes you’d like to see.
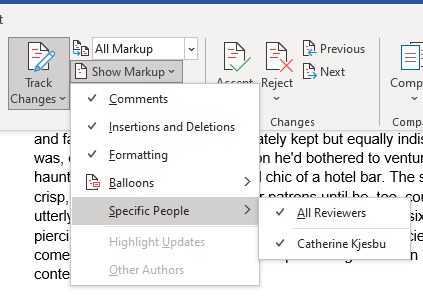
Note: Unchecking the “All” option automatically unchecks all the editors. You must go back in to select which editor(s) you’d like to see.
Want more information on how to use Track Changes? Check out this article from Microsoft.
Looking for other articles on writing and storytelling? We’ve got you covered.
Sign up for our newsletter to receive TWO FREE toolkits: Demystifying Query Letters and The Roadmap to Successful Self-Publishing.